In exterior design, paving plays a crucial role in shaping the aesthetic and functional appeal of outdoor spaces. Among the many options available, crazy pave tiles stand out as a striking choice that combines artistry, versatility, and practicality. Characterized by irregular shapes, natural textures, and a seemingly random pattern, crazy pave has become increasingly popular in both residential and commercial landscaping projects. This article explores the concept of crazy pave tiles, their design advantages, installation techniques, and how they elevate exterior spaces.
What Are Crazy Pave Tiles?
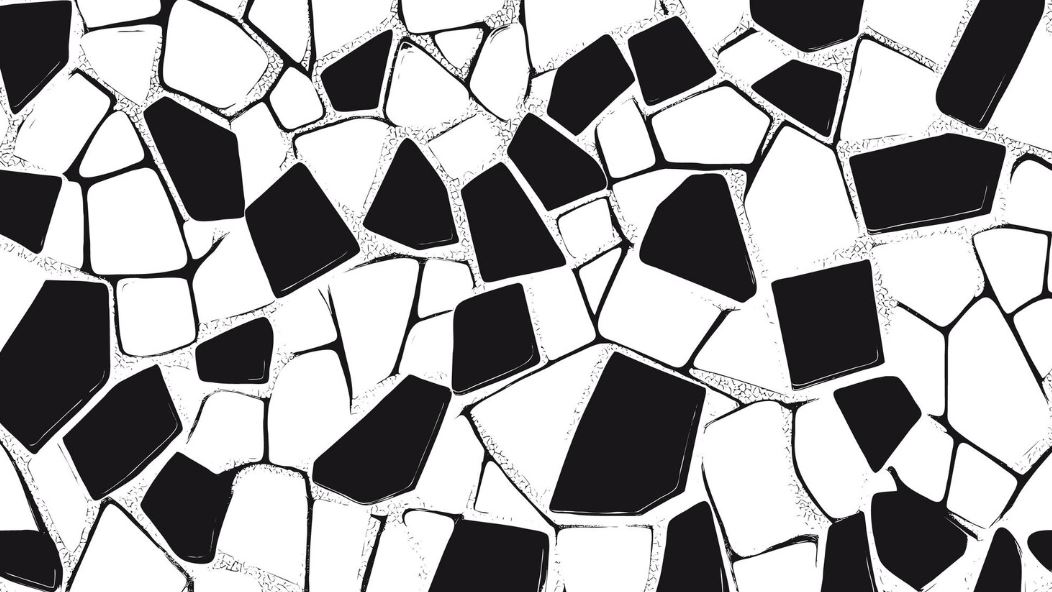
Crazy pave, also known as “crazy paving,” refers to a method of laying stone, tile, or concrete pieces in an irregular, seemingly haphazard pattern. Unlike conventional paving methods that use uniform shapes and repetitive patterns, crazy pave relies on asymmetry and variety. The tiles can be of different sizes, colors, and textures, often sourced from natural stone materials such as slate, granite, limestone, or sandstone.
The appeal of crazy pave lies in its ability to create an organic, rustic look while remaining functional. Each tile is carefully positioned to complement the surrounding pieces, forming a cohesive yet unpredictable pattern. While the result may appear random at first glance, a skillful designer can balance shapes and shades to achieve visual harmony.
Design Advantages of Crazy Pave in Exterior Spaces
- Aesthetic Versatility
Crazy pave tiles offer unmatched versatility in design. The irregular shapes and natural textures create a visual richness that rigid, rectangular tiles cannot match. Designers can mix and match colors to produce intricate mosaics or maintain a monochromatic palette for a more subtle effect. The result is a surface that looks both natural and intentionally artistic, perfect for gardens, patios, walkways, and courtyards. - Integration with Nature
Because crazy pave often uses natural stone, it seamlessly blends with outdoor landscapes. It complements greenery, water features, and natural terrain, making it a preferred choice for garden paths and backyard patios. The irregular patterns mimic the organic randomness found in nature, creating a harmonious transition between built and natural environments. - Slip Resistance
The uneven surface of crazy pave tiles provides excellent traction, making it safer for outdoor use. When wet, the irregular edges of the stones reduce the likelihood of slipping compared to polished, flat tiles. This makes crazy paving an ideal choice for pool surrounds, terraces, and areas prone to rain exposure. - Durability and Low Maintenance
Natural stone used in crazy pave is generally resistant to weathering, UV rays, and heavy foot traffic. While maintenance may involve occasional sealing or cleaning to prevent moss and weeds from growing in the gaps, crazy pave surfaces are highly durable and can last for decades with proper care. - Customization Potential
Crazy pave offers tremendous flexibility in terms of layout and creativity. Designers can incorporate geometric patterns, circular motifs, or freeform paths, allowing each installation to become a unique statement. Additionally, gaps between stones can be filled with gravel, sand, or grass, creating further aesthetic variation.
Popular Materials for Crazy Pave Tiles
- Natural Stone
The most traditional and popular choice, natural stones like granite, slate, limestone, and sandstone provide durability and elegance. They can be left in their natural form or cut into shapes that suit the design plan. Each stone has its own texture and color, ensuring a distinctive surface. - Concrete Tiles
Concrete crazy pave tiles offer a more affordable alternative to natural stone. They can be molded into irregular shapes and tinted in various colors to mimic the appearance of stone. Concrete is lightweight, easy to install, and suitable for large areas. - Recycled Materials
Sustainable design trends have encouraged the use of recycled tiles, broken ceramics, and repurposed bricks for crazy paving. These materials add character and reduce environmental impact, making them ideal for eco-conscious projects.
Design Ideas for Exterior Spaces
- Garden Pathways
Crazy pave is a favorite choice for garden paths because it complements natural surroundings. Irregular stones can guide visitors through flower beds, lawns, or wooded areas while adding visual interest. By alternating stone colors or sizes, designers can create focal points or highlight particular features. - Patios and Courtyards
For outdoor entertaining areas, crazy pave tiles create a rustic yet elegant platform. The unique pattern draws attention and can serve as a conversation piece. Pairing the tiles with wooden furniture, potted plants, or a fire pit enhances the overall ambiance. - Driveways and Walkways
While less common for heavy-use areas, crazy pave can be adapted for driveways with the right stone selection. Larger, thicker stones provide strength, while their irregularity adds charm and character to an otherwise functional surface. - Water Features
Crazy pave works beautifully around pools, fountains, and ponds, where the natural irregularity mimics riverbeds and shorelines. Its textured surface also provides slip resistance, making it safer in wet areas.
Installation Considerations
Installing crazy pave requires careful planning and attention to detail. Key steps include:
- Surface Preparation
The ground must be leveled and compacted. A sand or mortar base ensures the stones remain stable over time. - Stone Placement
Each tile is laid individually, with designers often “dry fitting” stones before final placement. The goal is to balance irregular shapes and avoid large gaps. - Filling Gaps
Gaps between stones can be filled with sand, gravel, or mortar. Alternatively, creeping plants like moss or thyme can grow between stones, enhancing the natural aesthetic. - Sealing
Applying a sealant protects the stones from weathering, staining, and moss growth. Sealing also enhances the colors of the stones, giving the surface a polished finish.
Trends and Innovations
Crazy pave is evolving beyond traditional stone. Modern exterior designers are experimenting with colorful ceramic pieces, glass fragments, and metallic accents to create visually striking outdoor mosaics. Some architects combine crazy paving with LED lighting embedded between stones to create illuminated pathways and artistic landscapes.
Moreover, sustainable materials and techniques are becoming more popular. Broken tiles and recycled stone pieces are used to reduce waste, while permeable base layers improve water drainage and prevent erosion.
Crazy pave tiles are a versatile, creative, and highly functional choice for exterior design. Their irregular patterns, natural textures, and aesthetic appeal make them ideal for gardens, patios, walkways, and courtyards. Beyond beauty, crazy pave offers practical advantages such as durability, slip resistance, and customization potential. Whether using natural stone, concrete, or recycled materials, this paving style allows designers to craft outdoor spaces that are both unique and harmonious with nature.
For homeowners and landscape designers looking to create a bold statement with timeless appeal, crazy pave tiles are a perfect solution—where every irregular piece contributes to a stunning, one-of-a-kind surface.